")
")
")
")
")
")
")
")
1. Registration

After successfully installing Voptop and starting the program for the first time, a window opens informing you, that there are no settings, yet. It also asks you, whether you want to register a new account. The registration process starts by confirming this request.

After entering log-in and password the new account is registered on the Voptop server. Voptop generates a new key to securely communicate with the Voptop server. Furthermore, by selecting “Autologin”, the client will be notified, that it should log-in automatically after every start of Voptop.
After completing the registration process, the Voptop client automatically connects to the Voptop network. The newly generated keys can be found under “RSA keys”.
2. Main Application

The Voptop main window displays all available contacts and their current status (“Online”, “Away”, “Offline”). By double-clicking a contact a telephone connection is made to the contact. Right-click on a contact opens a context menu. The context menu gives access to all the possible means of interaction with a contact. “Call <contact name>” establishes a telephone connection to the selected contact

![]() With the help of the "Telephone icon" a phone call to the currently selected contact can be established.
With the help of the "Telephone icon" a phone call to the currently selected contact can be established.
![]() The "Find Contact Icon" opens the dialog for finding contacts in the Voptop network.
The "Find Contact Icon" opens the dialog for finding contacts in the Voptop network.
![]() The "Edit Contact Icon" opens the dialog for editing a contact.
The "Edit Contact Icon" opens the dialog for editing a contact.
![]() Contacts can be deleted using the "Delete Contact icon". The contacts and their "People Files" are completely deleted.
Contacts can be deleted using the "Delete Contact icon". The contacts and their "People Files" are completely deleted.
![]() The "Settings icon" opens the voptop settings dialog.
The "Settings icon" opens the voptop settings dialog.

3. Deskbar

With the help of the Voptop "Deskbar-Icons" the current account status can be changed to "Online", "Away" or "Offline". The change to the status "Offline" logs off the client on the Voptop network. "Online" and "Away" register the account on the Voptop network, if this was not previously registered. In addition, the Voptop settings can be reached or changed via the "Deskbar icon" and Voptop be terminated.
4. Search contacts

The "contact search dialog" can be called up via the "search icon". The name of the contact you are looking for is entered in the input field of the search dialog. It is enough if only part of the name is entered. In the hit list below the input field all found contacts that match the search are listed. With a "double-click" on a search hit the contact to the own contacts is added (a success message appears).
5. Settings

The Voptop settings can be reached via the Voptop "Deskbar-Icon", or via the settings icon in the Voptop client. Within the Voptop settings there are four tabs: "Server", "Login", "General" and "RSA keys".
5.1 Server
In the "Server" tab you can set which server the Voptop client should connect to and which port should be used for this. It also sets the port on which incoming connections should be handled. The standard "Server port" is 48616 and the standard "Client port" is 48617. If the client connects through a "router" to the Voptop server, the "Client port" on the "Router" must be forwarded to the appropriate computer be (port forwarding).

5.2 Login
In the "Login" tab you can enter or change the account data used to log in to the Voptop network. A tick at "Autologin" ensures that the Voptop client automatically logs on to the Voptop network after starting the client.

5.3 General
In the tab "General" general settings of the Voptop client can be made. The volume of the respective opposite side of a telephone call can be set via the "Sound volume" slider, while the "Microphone volume" slider can be used to set the volume of your own microphone. The slider slider "Peer amount between caller" regulates the number of voptop peers through which a phone call or a message is tunneled.

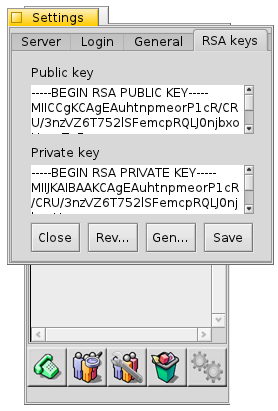
5.4 RSA keys
The "RSA keys" tab displays the current keys for secure communication with the Voptop server. Via the button "Generate" a new key pair can be generated.
Make available by BeSly, the BeOS, Haiku and Zeta Knowledgebase.