")
")
")
")
")
")
")
")
Prolog [Index]
The yabIDE is a development environment for yab. Using this editor is simple and all needed functions are included. The editor supports syntax highlighting so all yab commands and functions will displayed coloured. You can start your written code out of the IDE in order to test it. Since this IDE contains practically all functionalities, which needed for programming in yab.
This Tutorial will explain you how to use the yabIDE. Get fast first results in development with yab using this IDE. Only when you have fun to develop in yab you have fun to learn development in yab.
The yabIDE is part of the Source package of yab. You can get the package using CVS or get them from our download section (Install package for Zeta – Zip file for BeOS).
If you have downloaded yab with CVS you find the yabIDE in the following directory:
| /boot/home/yab-interpreter/yab-IDE |
You need to rename the downloaded yab directory from /boot/home/yab-interpreter into /boot/home/yab-1.0 because the yab application linked into it.
To rename the folder name seams to be stupid but this have a good reason, because you can get a newer version of yab using cvs without overwriting the used version. So you never lost any Data from the used yab directorys.
If you think it is stupid to do this, you can open the yabIDE Source file and rename all links into it. The yabIDE is included as Source file only, so all changes will take effect past restart the IDE.
If you have installed yab correctly you can start the IDE doing a double click on the yabIDE file.
If you have installed yab using our install package on Zeta you find the IDE in the software menu under Development.

1. Load Template
Every body who start to develop in yab want to use Templates.

To open the Template overview, open the yabIDE menu and select at File the selection New… Here you find all included templates.
If you select clear file, you get a clear Source file. This is not the best selection for someone who starts to develop in yab.
There is a Template with a simple window and the option to close this window. A other Template offers all functions to create an editor.
To look if there are more templates as you can see in the template menu, select in the file menu the selection Open… and search at /boot/home/ yab-1.0/yab-IDE/Templates for more.
back to Index
2. Display line numbers
There is a functionality almost missed in editors to display the line number. The yabIDE have this functionality.

There is a functionality almost missed in editors to display the line numbers. The yabIDE have this function.
The line numbers will not be displayed when you start the yabIDE first time or you don't have select it before. To display the line numbers click on the left border of the text edit and move them to the right.
back to Index
The Toolbar includes the most important functions of the Editor:
 |
Opens the template menu |
 |
Search the system for a existing file |
| Save source code. | |
 |
Close File |
 |
Cut marked part |
 |
Copy marked part into the ram |
 |
Paste part from ram |
 |
Undo last action |
 |
Run Source code using the IDE |
 |
Start Source code using the Terminal |
 |
Open the Build Factory to compile the Source code |
 |
Create a sample for the Pattern command |
 |
Open yabIDE Settings |
 |
Open yabIDE Help |
| Go to line. Enter line number or select them using the arrows. | |
| Search the Source file for entered Name. |
4. Shortcuts
Shortcuts are important for every programmer, because if you typing codes into the editor you are faster to use a shortcut as you switch your hand to the mouse and click on any button.
The most shortcuts are the same like the system ones. Some of them are IDE specific so we want to list here the important ones:
| Alt + N | Opens template menu |
| Alt + O | Opens filepanel to search for a file |
| Alt + C | Copy marked file/part into the ram |
| Alt + V | Past copied file/part from ram |
| Alt + X | Cut marked part |
| Alt + S | Save Source Code |
| Alt + Z | Undo last action. |
| Alt + W | Close Source Code |
| Alt + R | Run Source Code from IDE |
| Alt + T | Run Source Code from Terminal |
| Alt + F | Search of a name |
| Alt + G | Continue Searching |
| Alt + E | Opens Search and Past mask mask |
| Alt + A | Select All |
You can found more shortcuts behind the menu entries.
Back to Index
5. Help
The yabIDE have a help section included. Here you can find the all possible commands and where functionalities.

You can open the help section clicking on the help tab on the left bottom site of the ide. If you switch to the help section you can see the documentation of any selected command on that position there the source code is displayed before.
To switch back to the Editor, select the Files tab.
Back to Index
6. Run Commands
In the bottom site of the IDE you can find three tabs. If you select the middle tab, you can run yab commands directly.

To run a command directly enter it into the text control command - and press enter. You can see the result in the output field.
Back to Index
7. Find and Replace
If you want to find and replace one or more words/numbers select the search an replace section in the bottom site of the IDE.

Enter at Find the word you are looking for and at replace the word you want to replace the searched one.
You have the choice, if you want to search for a word only, press the search button. If the IDE finds a word you are looking for, he mark it. If you press again on the search button, the IDE search for the next word with the same name.
If you press on find and replace, the IDE search for the word and mark it too. Then you press again on find and replace the marked word will be replaced with the new name and the next word will be marked.
The third selection - replace all - search the source code and replace all founded words automatically with the new word.
If you want to make a more different searching, press on the checkbox for checking write style.
Back to Index
8. Run Source code
The most imported functionality of yab is to see every time how does it work and how does it look.
The yabIDE have two ways to test the written source code. The first way is to run the source code over the Terminal and the second way is to run the source code directly over the IDE. At booth ways you get different informations about the running source code if you enter a print command into your source code. For more Details look into the second beginners tutorial.
To run the source code over the Terminal click on the button with the rocked and the window. You can use the shortcut Alt + T too.

The source code will be started and run over the terminal. All messages will be displayed in the terminal. Over this messages you can search for problems and errors in your source code. The problem, using the terminal is, if you get a hard error, the terminal windows will be close and you don't see any message.
To run the source code directly over the IDE, press on the button with the ![]() rocked sign or use the shortcut Alt + R.
rocked sign or use the shortcut Alt + R.

Testing over the IDE have a big advantage, because all messages about errors in the source code will be displayed as link. If you do a double-click on the link the ide jumps into the line with the error.
Back to Index
9. Error tracing
If you get a error message during running the source code you can see them in the Terminal or the IDE.
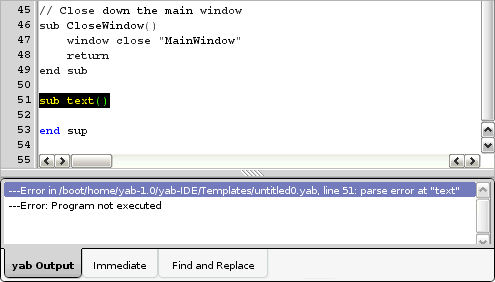
The output of the error message is the same. The advantage of the IDE will be a big help, because you jump directly into the line with the problem and don't need to search for it scrolling the source. Only do a double click on the error message and jump to the problem.
You can see the needed information's about the error in the error message. In our example we use a reserved word for a sub routine. All reserved words are coloured in blue.
Gladly made errors are open a loop but not return them or start an if query but never close them. Please every time close or end all things you are open so you don't get to many errors
You don't get every time the real error position in you code, because if it is a problem in a subroutine you see as error position the end sub. Here you need to check your code line by line beginning with the sub start position.
Back to Index
10. Save Source code as Template
If you program many times the same or something similar it makes sense to save your work as Template. This is a easy thing. Open the File menu and select Save as Template.

First you need to name the template in the save template window at template name. Use a name that descripts the function of the template clearly.
In the other two text controls enter a description of the template. If the template have more then one functionality enter all information's about it.
If you want to add a screenshot for the template drop them on the black/yellow field. The screenshot need a width of 200 pixel and a height of 100 pixel.
If you have added all information's about the template, save it with pressing the save button. After this you can select your template over the file menu New...
Back to Index
11. Format source code
There is a automatic format option in the IDE for all people who make there source code chaotic.

To do this, open the view menu and select Reformat Sourcecode.
Back to Index
12. Build Factory
The Build Factory can compile your source code as a C++ application. In the beginners dev you only bind the source, but to compile is the better way. The application will be smaller and you don't bind yab on the source. No one can look into your source code using a application like QuickRes. You have only this option to complete your project. If you want to bind the source you need to use the terminal.
To open the Build Factory select in the program menu the option Build Factory.
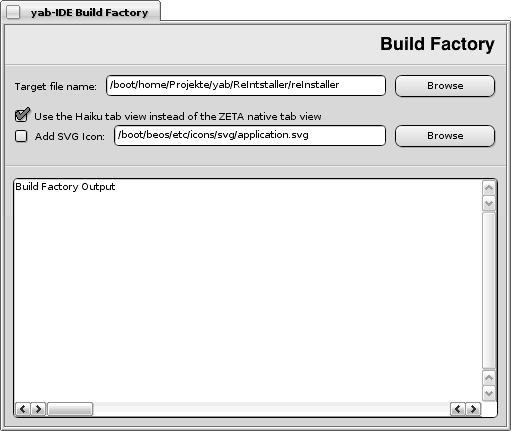
To compile your source code with the Build Factory, select at Target file name the File you want to compile. You need to overwrite the source file (please make a copy of your source code before you overwrite it).
If Use the Haiku tab view instead of te Zeta tab view is activated ![]() the Build Factory use the Haiku Tabs (select it only if you use Tabviews).
the Build Factory use the Haiku Tabs (select it only if you use Tabviews).
To compile the source, press the compile target file button. The Build Factory compiles the source and display the status of compiling. If there are errors during the compiling you can see it in the output field.
Back to Index
13. Settings
To enter the settings area, select at the view menu the option settings. You only can open then settings area then you have opened a source file. There are two setting parts, the first one is for the Editor and the second one for Environment.

In the Editor settings you can find options like saving the source before you can run it. You can change the font for the Editor and many more.

The most interesting option is the automatic complete option. Here you can add your own words and commands. You can set the number of signs there the auto complete option running. If you set the sign number to 2 the IDE will auto complete at the second sign you typing in the Editor.

At Environment you can setup your application directories (of the IDE). It means the directory for the yabIDE binary and the yabIDE directory.

In the Language options you can select the language fort he IDE using the Zeta local kit. Here you can activate and deactivate the Local Kit.
Back to Index
Tutorial by Lelldorin (Christian Albrecht), March 2007
Made available by BeSly, the Haiku knowledge base.